Google マイマップで KML を作る(書き出す)
RouteCross に投稿する KML/KMZ ファイルを、Google マイマップから書き出す手順です。
更新日: 2026-09-20
RouteCross に投稿できるのは、地図の上に線として描けるルートを含んだ KML または KMZ のファイルです。Google マイマップで作ったルートは、書き出して、そのまま投稿できます。
以下の画面は、パソコンのブラウザで撮影したものです。画面の表記は、Google の更新で変わることがあります。
1. ルートを用意する
Google マイマップ で、走りたいルートを作ります。使い方は、Google のマイマップ ヘルプを見てください。
KML を作るうえで重要なのは、道路に沿った線(ルート)です。マイマップでルートのレイヤを作り、出発地・経由地・目的地を指定すると、道路に沿った線ができます。
左のパネルには、ルートのレイヤが表示されます。移動手段(ここでは「車」)と、出発地(A)から目的地(F)までの地点が並びます。地点は「目的地を追加」で増やせます。
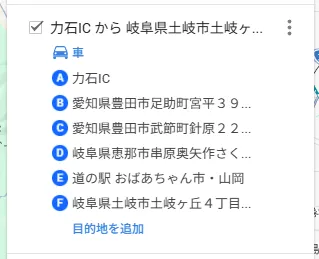
図 1: ルートのレイヤ(地点 A〜F)
地図には、地点を結ぶ線が表示されます。この線が、RouteCross に投稿するルートになります。
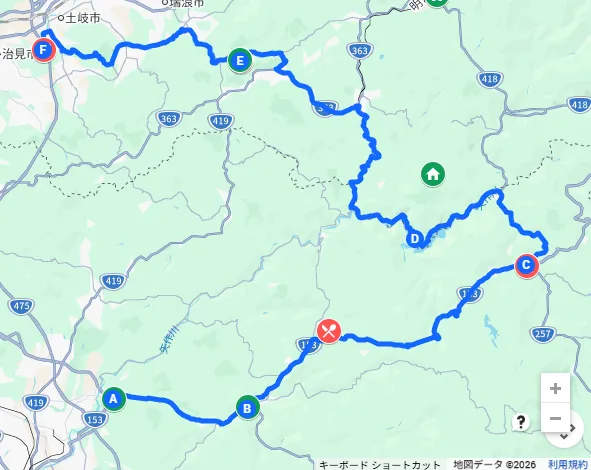
図 2: 地図に表示されたルート
出典: Google Maps(Google マイマップの画面)。地図データの著作権は、Google および各データ提供元に帰属します。
RouteCross に投稿するために必要なのは、次の 1 点です。
- 地図に、線(ルートまたはライン)が 1 本以上あること。マーカー(地点)だけの地図は、投稿できません。
経由したい場所にマーカーを置いて名前を付けておくと、RouteCross のルート詳細の地図に、ルートに沿った順の番号付きピンとして表示されます(任意)。
自宅など、個人宅とわかる場所を始点・終点にしないでください。個人の連絡先を、地点の名前や説明に書くのも避けてください。
2. KML/KMZ に書き出す
地図のタイトルの右にある「︙」を開き、「KML / KMZ にエクスポート」を選びます。
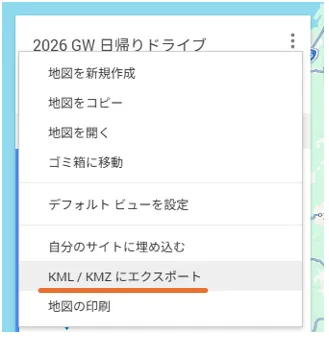
図 3: 「︙」のメニュー
表示された画面で、範囲を「地図全体」にして、「ダウンロード」を押します。
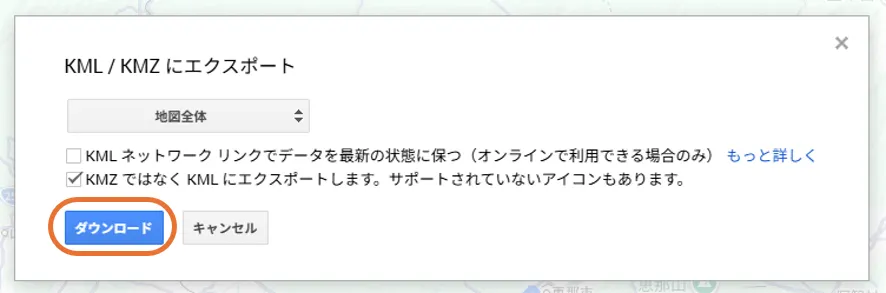
図 4: 書き出しの画面(ここでは KML で書き出す設定)
- 「KML ネットワーク リンクでデータを最新の状態に保つ」は、オンにしません。オンにすると、ルートのデータそのものではなく、地図への参照だけのファイルになります。
- 「KMZ ではなく KML にエクスポートします」は、オンでもオフでも構いません(オフなら KMZ、オンなら KML)。RouteCross は、どちらも受け付けます。
.kmz または .kml のファイルがダウンロードされます。
ファイルサイズの上限は 3 MB です(KMZ は、展開した KML のサイズで見ます)。
3. RouteCross に投稿する
- RouteCross にログインし、「投稿する」 を開きます。投稿には、ログインとニックネームの登録が必要です。
- 書き出したファイルを選び、ルート名と主な移動手段(バイク・車・自転車・その他)を入力します。説明は任意です。
- 「投稿する」を押すと、ルートがサイトに公開され、誰でも閲覧・ダウンロードできるようになります。
うまくいかないとき
- 「このファイルから経路(線)を読み取れませんでした」と表示される: 地図に線が入っていない、または「KML ネットワーク リンクでデータを最新の状態に保つ」をオンにして書き出した可能性があります。確認して、もう一度書き出してください。
- 「ファイルサイズが 3MB を超えています」と表示される: 投稿するルート以外のレイヤや、細かい図形を地図から削除してから、書き出してください。
- KMZ ファイルを読み込めない: ファイルが壊れていないか確認し、もう一度書き出してください。
Create and export KML with Google My Maps
How to export a route from Google My Maps as the KML/KMZ file you post to RouteCross.
Last updated: 2026-09-20
RouteCross accepts KML or KMZ files that contain a route drawn as a line on the map. A route you made in Google My Maps can be exported and posted as is.
The screens below were taken in a browser on a computer. Wording on the screen may change when Google updates My Maps.
1. Prepare a route
Create the route you want to ride or drive in Google My Maps. For how to use it, see Google’s My Maps Help.
What matters most for the KML is a line that follows the roads (the route). In My Maps, create a route layer and specify a start, waypoints, and a destination, and a line that follows the roads is made.
The left panel shows the route layer: the mode of travel (here, driving) and the points from the start (A) to the destination (F). You can add more points with “Add destination”.
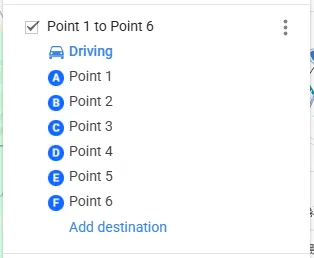
Figure 1: The route layer (points A–F)
The map shows a line connecting the points. This line becomes the route you post to RouteCross.
Figure 2: The route on the map (place names on the map are in Japanese)
Source: Google Maps (a Google My Maps screen). Map data copyright belongs to Google and its data providers.
What RouteCross needs is this one thing:
- The map has at least one line (a route or a drawn line). A map that only has markers (places) can’t be posted.
If you place markers at the places you want to pass through and give them names, RouteCross shows them on the route detail map as numbered pins, in the order they appear along the route (optional).
Please don’t use a place that is clearly someone’s home as the start or end of a route, and avoid writing personal contact details in place names or descriptions.
2. Export as KML/KMZ
Open the “︙” menu to the right of the map title, and choose “Export to KML/KMZ”.
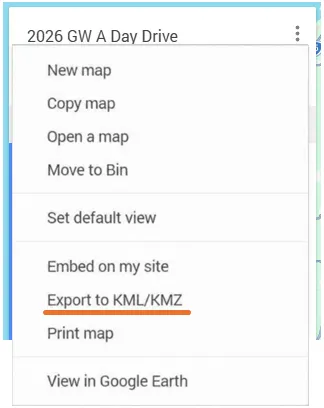
Figure 3: The “︙” menu
In the window that appears, set the range to “Entire map” and press “Download”.
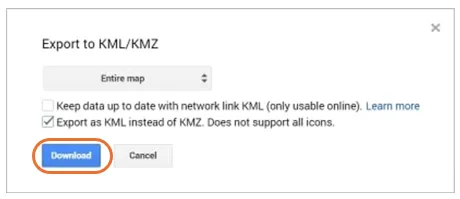
Figure 4: The export window (set here to export as KML)
- Leave “Keep data up to date with network link KML” off. If it’s on, the file holds only a reference to the online map, not the route data itself.
- “Export as KML instead of KMZ” can be either on or off (off gives a KMZ, on gives a KML). RouteCross accepts both.
A .kmz or .kml file is downloaded.
The file size limit is 3 MB (for a KMZ, it applies to the KML inside).
3. Post it to RouteCross
- Log in to RouteCross and open Submit. Posting requires logging in and registering a nickname.
- Choose the exported file, and enter a route name and the main mode of travel (motorcycle, car, bicycle, or other). The description is optional.
- Press “Submit”, and the route is published on the site so anyone can view and download it.
If something goes wrong
- You see “We couldn’t find a route (line) in this file”: The map may not have a line in it, or it may have been exported with “Keep data up to date with network link KML” turned on. Check, and export again.
- You see “The file is larger than 3MB”: Delete layers you don’t need for the route, and any small detailed shapes, from the map, and export again.
- The KMZ file can’t be read: Check that the file isn’t corrupted, and export it again.